A WordPress plugin is a program or a set of one or more functions that can be added to a WordPress website. Plugins are generally written in the PHP language and integrate seamlessly with WordPress. Plugins can extend the functionality of WordPress websites by adding features such as contact forms, image galleries, SEO optimization, and more. Plugins are available for free in the WordPress Plugin Directory and can be installed and activated directly from the WordPress administration area. The process of installing a plugin in WordPress is so easy, but it may feel difficult for those who just start a website.
So, in this article, I will show how to install plugin in WordPress website. Let’s have a quick view on the WordPress plugin.

Table of Contents
What is a plugin in WordPress?
A plugin is a type of software that adds additional features and functionality to a WordPress website. Plugins can be used to extend the core functionality of WordPress and to add features, such as contact forms, custom post types, galleries, social media integration, and more. There are about 60,272 free plugins available in the WordPress plugin directory as on Feb 2023(when the article was published). WordPress plugins can be downloaded from the official WordPress plugin directory, or they can be developed and uploaded to the directory. Plugins can be activated and configured from the WordPress dashboard, allowing users to quickly customize their WordPress website.
So, let’s begin with how to Add Plugins to WordPress.

How to Install Plugin in WordPress? Step-by-step
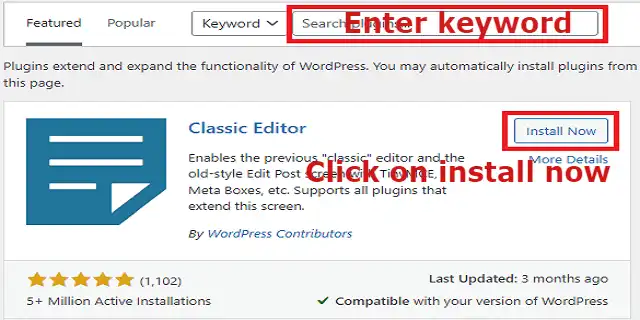
Installing a plugin in WordPress is a relatively easy process. To begin, log in to your WordPress dashboard. Once logged in, you will need to find the ‘Plugins’ tab on the left side of the screen. After selecting the ‘Plugins’ tab, select ‘Add New’ and you will be taken to the plugin repository. Search for the specific plugin you want to install and select it.
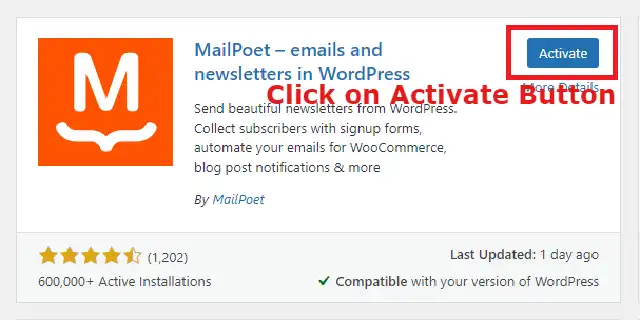
Once you have found the plugin, click ‘Install Now’ and WordPress will do the rest. After installation is complete, click ‘Activate Plugin’ and you are done. If you’re installing a plugin from a third-party source, you can simply upload the plugin file in the ‘Plugins’ tab and follow the same activation process. Installing a plugin in WordPress is simple and straightforward, and with a few clicks, you can have your website set up with the plugins you need.
Here is the step-by-step guide to installing plugins in your WordPress website.
How many ways WordPress plugins can be installed
Plugins can be installed in a few different ways in WordPress.
The first and most common way is to use the WordPress Plugin Directory. This is the official repository for WordPress plugins and it’s free to use. All you need to do is search for the plugin, click Install Now, and then activate it.
Steps to install a WordPress plugin on Admin Dashboard
1.Log into your WordPress Admin Dashboard.
2. Under the “Plugins” tab in the left-hand menu, click “Add New”.
3. Type the name of the plugin you would like to install in the search field.
4. Once you’ve found the plugin you’d like to install, click “Install Now”.
5. Once the plugin is installed, click “Activate”.
6. After activating the plugin, you may need to configure the plugin’s settings.
7. If the plugin requires any additional steps, follow the instructions provided on the plugin’s page.
8. Once the plugin is installed and activated, you can start using the plugin’s features.
Install plugin directly to WordPress
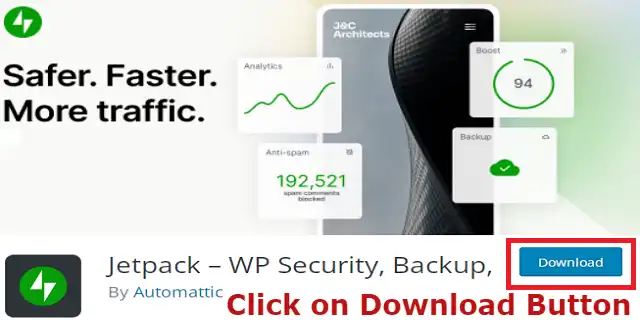
Another way to install plugins in WordPress is to upload the plugin files directly to your WordPress website. This is done by downloading the plugin, extracting the files, and then uploading them to the plugin’s directory in your WordPress installation.
Install plugins from a third-party source
You can also install plugins from a third-party source. This involves downloading the plugin from a third-party source and then uploading it to your WordPress installation.

How to install plugins from a third-party source?
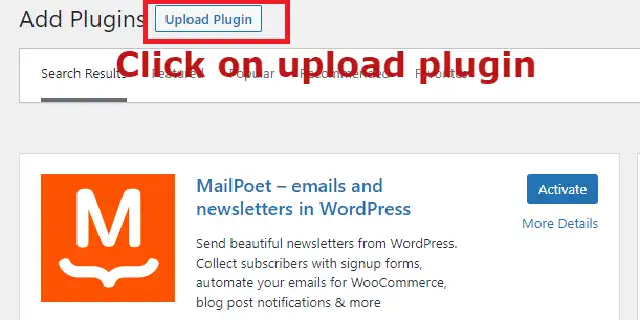
To install a plugin from a third-party source, first, locate the plugin you want to install. Download the plugin files, usually a zip file, then open your WordPress dashboard. Select “Plugins” from the left-hand menu, then select “Add New“. On the Add Plugins page, select “Upload Plugin” at the top. Select the zip file you downloaded, then click “Install Now“. WordPress will install the plugin and you will be presented with a “Plugin Activated” message. You can now activate the plugin and start using it.
Some plugins are available as software packages. These packages can be installed via FTP or a web hosting control panel.
How to add plugin to WordPress website using FTP?
Adding a plugin in WordPress using FTP requires you to have access to your web server. For that you need to install an FTP client software in your system to add a plugin via FTP:
There is so many FTP client software such as FileZilla, WinSCP, Core FTP, and many other. Most of them are similar so you can use any one of them but I prefer “FileZilla” personally because it is one of the best FTP Client software and most people use it.
Here are the steps to install plugin via FTP
- Download the plugin to your computer.
- Extract the plugin folder.
- Connect to your web server using FTP client.
- Navigate to the wp-content/plugins directory in your WordPress install.
- Upload the plugin folder to the wp-content/plugins directory.
- Log in to your WordPress admin area and go to Plugins.
- You should see the plugin listed.
- Activate the plugin.
Once the plugin is installed and activated, you can configure the settings for it in the WordPress admin area. Depending on the plugin, there may be different settings to configure. After the settings are configured, you can start using the plugin.
However, No matter which method you choose, it is important to always make sure you’re using the latest version of the plugin. This helps to ensure that the plugin is compatible with your version of WordPress and is secure.
Caution:- Remember Using the FTP method is not beginner friendly.
FAQs
How to install WordPress plugins from a zip file?
Installing plugins from a ZIP file is a simple process.
1. Download the plugin from the source.
2. Log into your WordPress Dashboard.
3. Go to the Plugins tab and select Add New.
4. Click on the Upload Plugin button.
5. Select the ZIP file containing the plugin you wish to install.
6. Click Install Now.
7.WordPress will now install the plugin.
8. Once the installation is complete, you will be able to activate the plugin.
It is important to note that the plugin must be compatible with your version of WordPress. If you are unsure, it is best to check with the plugin developer before installing. Additionally, some plugins may require you to enter a license key or other information before you can activate the plugin. Be sure to follow the instructions provided by the plugin developer.
How to find plugins in WordPress website?
To find plugins in a WordPress website, you will first need to log in to your WordPress Dashboard. Once logged in, you will want to go to the left side of your Dashboard and select the ‘Plugins’ option. From there, you can view the plugins currently installed on your website, as well as search for any new plugins you would like to add.
You can search for plugins by keyword or by category, such as ‘Search Engine Optimization’ or ‘Security’. You can also browse through the featured, popular, and newest plugins available. Once you find the plugin you are looking for, you can click ‘Install Now’ to add the plugin to your website.
How to install plugins in WordPress free?
1. Log into your WordPress website.
2. Go to ‘Plugins’ in the left menu.
3. Click ‘Add New’ at the top of the page.
4. Search for the plugin you want to install.
5. Click ‘Install Now’ for the plugin you want to install.
6. Once the plugin is installed, click ‘Activate’.
5. Go to the plugin’s settings page to configure the plugin if desired.
6. Check out the plugin’s documentation to learn more about how to use the plugin.
7. Repeat the steps above to install more plugins.

Conclusion
Installing a plugin in WordPress is a quick, easy, and effortless process. With the help of a few clicks, you can add a variety of features and functionality to your WordPress site. This makes it a great way to enhance your site and make it more powerful. It also ensures that you have access to the latest features and updates. With the help of a good selection of plugins, you can make your website more user-friendly and attractive to visitors. All in all, installing a plugin in WordPress is an effective way to add features and functionality to your site without having to write code or hire a developer.
[ajax_load_more]
- What is a Compiler?Difference between Compiler/Interpreter - November 27, 2023
- What is system software? How it works and its types - November 26, 2023
- Why website does not rank despite good SEO? - November 25, 2023